Saturday 31 August 2013

Art dolls… my new favourite thing!

Hi everyone :)

I’ve been getting all creative this weekend and the ideas are really flowing… it’s a good thing!  Recently I’ve noticed the Prima mixed media art doll stamps designed by Julie Nutting… and from the look of quite a few of the arty blogs out there lots of other people have been noticing them too!

At the end of last week I decided to get a couple of the stamps for myself and see what all the fuss was about and on Tuesday a lovely little package arrived for me:new stamps

If you haven’t seen these stamps yourself they're actually not so little!  The doll is actually almost 8 inches tall!  I’ve been wanting to stamp her all week because one of my sisters’ is celebrating her 40th birthday today and I wanted to make her a card… but I wasn’t even able to take them out of the packaging until this morning… and I tell you I’ve had FUN today!

I did a fair bit of stamping… lots of ‘fussy’ cutting and some paper piecing… so many options were available with all the paper I’ve got in my stash!  It didn’t take me too long to come up with a birthday card for my sister… which I then emailed her a photo of and it will be in the post on Monday morning!  Here’s her card:

Tracey's card

The card is 4 inches x 9 inches so it’s a good size and I’ve used some of the 6x6 paper pad I bought last weekend to create her dress.

I liked the way this girl came together so much that I had to make one for me using the same papers… and of course I had another stamp to use as well so next came two tags:

tags

I had to cut the tags out with my Silhouette because the doll is too tall for the Tim Holtz die tags I usually use… but that just meant I could use some more of my paper stash!

By the time I’d done these two I didn’t really want to make any more tags but was still enjoying the stamping, cutting and colouring so I made some more dolls… not sure what I’m going to make with them yet… maybe some more cards??

dolls

I have a couple of friends who will be celebrating their birthdays in the next couple of months so these girls might really come in handy!

So here’s my productivity for the day:all

It’s been a good day for being creative!

Friday 30 August 2013

Feel Good Friday

Hi everyone :)

In amongst all the other goings on this week, my class has unmoulded their hypertufa pots… and they turned out GREAT!

We didn’t have a single pot break which was awesome and the kids were really impressed with the ‘almost finished’ results.  Of course they are really keen to plant into them… but they need to fully cure which takes about another three weeks. 

In class, we’ve been thinking about some of the other things you could make with hypertufa and the ideas list keeps growing and growing.  They’re really keen to give it another go so we’ll have to see if we have time for that towards the end of the term.

In the meantime, here are some hypertufa pots and items I found on the internet:week 35 - hypertufa copy

I have to admit that those ‘face planters’ have really caught my eye… would love to have a go at them!

Have a good Friday everyone xx

Sunday 25 August 2013

Project Life: Week 34

Hi everyone :)

Yes, I’m like a ‘bad penny’ and I’m back again.  This time it’s with my Project Life update for the week.

Here’s an overview of the week:Full_1

With all the new planning, assessments and paperwork we have going on at school it’s easy to get ‘lost’ and Chris was feeling a bit lost with her maths planning.  When I told her that I’d found a good way to do it that really worked for  me and saved me HOURS she was keen to have a look so we went back to my classroom and spent a bit of time with the resources in front of us.  She went away quite happy and has since updated me with the news that it’s really working for her and her kids!  It’s so neat when we can support each other to make life easier… that’s definitely working ‘smarter rather than harder’ in my opinion!

While I’m on the subject of school… we’re studying the environment this term and my kids have done some GREAT writing!  Plus they’ve been doing really well with their reading contracts.  We’ve also been busy in the afternoons with some ‘hands on’ activities.

Here’s a closer look at the start of the week:Left_1

Our ‘hands on’ activity this week was making hypertufa pots.  If you’re anything like the rest of our staff you’re probably wondering what hypertufa is.  Basically it’s a mix of:

  • two parts peat moss
  • one part cement
  • one part sand
  • mix together with water to form a ‘mud pie’ consistency and then you can mold it into the shape you want

It’s been really cold at school in the afternoons this week but you couldn’t keep my kids inside if you tried… there’s nothing like learning something cool to get the excitement going!

The kids worked hard… the made their pots in pairs and armed with the ‘ingredients’, buckets and dowels for making the drainage holes they were pretty happy.  The fact that they got to wear rubber gloves seemed to add to their excitement!

To give you an idea of what we’re actually attempting to make, here’s an example from the internet:6a0148c712e703970c016305efdd8f970d

We made our pots inside ice cream containers and we now have 27 pots drying outside our classroom.  At the end of this week we’ll take them out of the containers and then they have to dry for another three weeks before we can plant into them… it’s going to be a long wait!

Here’s the second part of my week:Right_1

On Friday, my brand new Faber Castell Gelatos arrived and I was super excited!  I opened the package up in my classroom and the kids thought I’d bought them lip glosses!  The Gelatos come in such gorgeous colours and I’d already seems lots of tutorials on HOW to use them but I decided that I would make myself wait until I’d done all my maths marking over the weekend… it was definitely hard to wait but at least now my books are all totally up to date!

On Saturday morning Toby and I went out to the firewood place… actually we went out there twice because we needed heaps of wood… but not enough for a truckload.  He’s good company but not much help when it comes to loading the firewood into the boot of the car… he looks at me with his ‘I’ve got no thumbs’ look… honestly if he HAD thumbs there would be some other excuse!

After we’d finished doing the wood I shot into town to the picture framers to pick up my Gypsy Queen which I’d finally had the guts to get re-framed.  When I was given the picture in it’s original (and hideously ugly frame) my Granny made me promise not to get rid of the frame but I think she’d be pleased by how it has turned out now!

Just after lunch Sheree turned up from Katikati and we met up at Spotlight… BIG mistake because I saw some lovely papers and paints that we’re just ‘perfect’ for a project that I want to do!  But we did go out for hot chocolate/coffee afterwards and had a wonderful catch up!  Check out our delicious afternoon tea from Capers:

IMG_9682_1

Then it was back home to carry on marking maths books… I did a really thorough job and making lots of notes so it was taking quite a while.  This morning I finally finished the last six books and then it was time to ‘play’.

If you visited my blog earlier today you’ve already seen the art journal page I did with my lovely Gelatos!!  Super happy with it and keep looking at it and feeling pretty clever about the whole thing!

I’ve even been up to the laundrette and gotten all my washing dry already but quite frankly I can’t be bothered doing the groceries so I think I might just shout us pizza for dinner… haven’t had that for ages and it’s exactly what I feel like having!

I hope you’ve all had a great weekend… I know my friends who went to Scrapfest by the Sea are probably all feeling pretty tired right about now… but from what I’ve heard it was a fantastic weekend!

Have a good week xx 

Art journal page using Gelatos! and a tutorial

Hi everyone :)

When I went to Creative Adventure Downunder a couple of months ago I was introduced to Faber Castell Gelatos by Donna Downey.  We didn’t actually do much with them and I didn’t think too much more of them until a few weeks ago when I came across Debra Buckland’s blog… and oh my, all of a sudden I was thinking that I simply HAD to have some of my own to ‘play’ with!

You might be wondering what Gelatos actually are so here’s a very brief description:

Gelatos®

Nothing on the market today compares with Design Memory Craft Gelatos®.  Compact acid-free pigment sticks glide on creamy smooth for vibrant colour and coverage.  All Gelatos® blend easily with or without water.

They come in packs:https://blogger.googleusercontent.com/img/b/R29vZ2xl/AVvXsEifoZfkyKM4Txz5oip7ecTntOuX088-425oVMBg80deXOADumvxBnzvqoQhlG3MF31OGmv9zklV0eetI5BlkCQSc8HNmHnAe2ITgnHYMDW0edQmzZzOgXjkwN9ctyT3YxtQR1NczEXMl6M/s1600/P8265930.JPG

And a large set (which is what I bought)http://ecx.images-amazon.com/images/I/51SAOLxQf1L.jpg

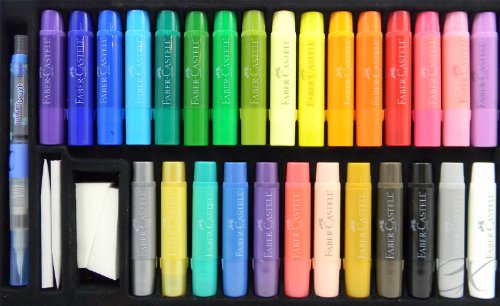
I did a bit of Google searching and couldn’t find anyone in NZ who sold Gelatos… and of course I couldn’t let it go at that so I contacted Debra through her blog and got some info from her.  She’s set up a Facebook group for anyone interesting in using/buying/sharing techniques for Gelatos and it’s GREAT!  If you’re at all interested in getting Gelatos or learning how to use them then we’d love to see you join the group.

To cut a long story short… I ordered my Gelatos and they arrived on Friday while I was at school.  I was desperate to ‘play’ but I promised myself that I’d get all my maths books marked and up to date before I used them… and this morning I got up early and finished the last 6 books and I’ve been ‘playing’ ever since!

So here’s what I’ve come up with:IMG_9728

I’m super happy with it… and totally loving Gelatos!  So many possibilities for using them.  I’ve had some really wonderful comments about my tutorials so I’ve done the step-by-step photos to go with this page.

I started off with a background that I’d made ages ago… in fact I think it might be one of the ones I made while I was staying at Krystal’s.  The poppy flowers were made using a Donna Downey cutting file from the Silhouette along with some texture paste.  The whole page had already been painted with gesso so I was able to start straight away!

IMG_9692

I have to admit that I didn’t even do a ‘test run’ on the colours… I just put them straight onto my page… must have been feeling brave LOL

I started off with a bit of blue on the ‘sky’ area… I just ‘scribbled’ it on like I’d see people doing on You Tube and it seemed to work fine.IMG_9693

Then I used my finger to blend the colours togetherIMG_9695

Because the poppies were quite ‘high’ on the page I couldn’t get my fingers in close to the flowers so out came the paint brush and a bit of water… Gelatos are water soluble!IMG_9696

Next up it was time for some yellow… and a bit more scribbling!IMG_9697

More blending but this time with the stick blender that came with the box:IMG_9699

And then a bit more water brushing:IMG_9701

I wanted green at the bottom so I went through the process again:IMG_9702

This time I blended with one of the little sponges that came in the box and I think this might be my favourite way of blending the Gelatos!IMG_9703

I had my basic background by this stage so I started layering in some more colours and blending as I went:IMG_9704IMG_9705IMG_9706IMG_9707IMG_9708

By this stage I was pretty happy with the colours but I wanted to ‘soften’ them a bit so I got out a wet wipe and did a bit more blending until I was happy with the result:IMG_9709

Since I didn’t want to ruin my background when I did my flowers I decided to spray it with some fixative:IMG_9710

Ok… onto the poppies!  I was determined to do ALL the colouring with Gelatos for this page but at this point my hands were ‘itching’ to grab out my Pan Pastels!  I’m happy to report that the ‘determination’ won over the ‘itching’ and I’ve learnt heaps in the process!

I added some red to one of the poppy flowers by mixing it with a little bit of water on my brush but wasn’t that happy with the colour so I grabbed out a little eye shadow applicator and thought it might work…IMG_9711

and it worked absolutely fantastic!IMG_9712

I carried on doing the rest of the poppies and then started on the ‘buds’ with some chocolate Gelato:IMG_9713

The eye shadow applicator turned out to be great because it could get into all the little pieces of texture created with the modelling paste!IMG_9714

I added a little bit of the chocolate colour to the bases of the poppy flowers to create some more depth and then I sprayed my page with fixative again before moving on:IMG_9715

Next up was the stems.  These proved to be quite tricky… even with the eye shadow applicator but it worked out in the end:IMG_9717

I thought my page was looking a little ‘flat’ at this point so I grabbed one of my Heidi Swapp stencils, a foam brush and some gesso and set to work:IMG_9718IMG_9719

Then I gave it a quick blast with the heat gun to dry the gesso… patience still isn’t one of my virtues!IMG_9720

The gesso dots were a little bit ‘in your face’ so I used the sponge applicator I’d used for the background and went over them to ‘soften’ them up a bit:IMG_9721

Now for some depth and shading!  I got out my charcoal pencil and added some shadows to the stems and the bases of the poppies and then I used a wet paintbrush to smudge and soften the shadows:IMG_9722IMG_9723

I wanted to add a quote to my page and when I had a look at the rub-ons I bought yesterday at Spotlight it seemed perfect.IMG_9725

I added the date tag to my page…IMG_9726

And then it was straight into my art journal:IMG_9727

I’m really pleased with my Gelato purchase and I love how they blend so well.  They really do make you feel like a bit of an artist!

IMG_9728 copy

Thanks for visiting… and remember to join the Facebook group if you’d like to know/learn/share more about Gelatos!

Friday 23 August 2013

Feel Good Friday

Hi everyone :)

If you’re a regular visitor to my blog then you’ll know that this year I’ve been doing some PD (Professional Development) in writing.  In all the years I’ve been teaching I’ve had LOADS of PD in maths and reading… mostly because that’s what a lot of primary schools seem to focus on… but I’ve never, ever had the opportunity to do writing PD.

I seem to have taken to it like a ‘duck to water’ and I’m very happy to say that my kids writing has really improved this year!

I decided to do some ‘report writing’ with them because in the past I’ve really struggled to teach this style of writing and it’s generally ended up with kids copying information from books, articles and the internet… but no more!

We’ve done a piece of report writing about ‘How bees make honey’  (Sheree will be pleased) and the kids are mostly finished now.  I thought they were doing well but when the Principal came in and read some of the reports and asked them ‘where did they copy the information from’ the kids quickly informed him that they had written their reports in ‘their own words’… he was flabbergasted because even my ‘low writers’ had done a really good piece of writing!

While he was in the room he was asking them questions about honey making and they were using words like… labour-intensive and enzymes… they even told him that basically honey is like ‘bee vomit’ because ‘the bees regurgitate the nectar to get it from the worker bees to the hive bees’… was he impressed?  TOTALLY!!  Although, I think it may have put him off eating honey on his toast for a while. LOL

So in honour of my kids writing I’ve got a page for my album all about bees and honey:week 34 - bees copy

I hope we haven’t put you off honey!

Have a great Friday and wonderful weekend xx

Tuesday 20 August 2013

Art Journal page… and not everything worked out!

Hi everyone :)

You know how not everything works out the way you ‘planned’ by sometimes it all comes good in the end?  Well that was what happened with my art journal page on Saturday. 

Having said that… I’ve learnt HEAPS by playing :)

I started off thinking that I wanted to do a canvas page so I cut some canvas to the right size and sewed it to a piece of plain card… thinking it would give it stability… more on that soon.

IMG_9489

I was keen to try some image transfer techniques so I printed (on my ink jet printer) some of the images I’d used on my latest Feel Good Friday.

IMG_9493

Then I got out my Reeves Gel Medium and got busy painting the canvas where I wanted my biggest image to go.

IMG_9494

Next came the image which I burnished with a spoon… only because I couldn’t find my bone folder LOL (I’m going to have to create a basket for my basic tools)

IMG_9495

I did EVERYTHING I’d seen on the You Tube tutorial and was super excited to see my image transferred… but it just wasn’t to be!  What I ended up with was a very faint image of the picture and it was REALLY pink!  One happy little accident though… it did leave a wonderful texture on the picture!

IMG_9496

I wasn’t giving up just yet so I got out my Claudine Hellmuth multi-medium gel.  This does image transfers from ‘laser copies’ but I didn’t have laser copies so I figured I’d just give it a go anyway.  I followed all the steps above but with this gel you have to let it dry COMPLETELY so out came the heat gun to get it dry.  Then you have to spray with water to rub the paper away and reveal the image… here’s how it turned out:

IMG_9498

Considering that image was from my ink jet printer I was pretty pleased with the results!  I figured that at this point I had nothing to risk so I re-did the first picture using Claudine Hellmuth’s gel… I even used the original picture that didn’t work the first time and voila!

IMG_9512

It was at this point that I tore the card away from the canvas because the card was all buckled from the water and no amount of drying was going to get my page flat again!

Next I got out some of my paints to add a wash and ‘fill in’ the blank areas.

IMG_9515

I want over the whole page with a very watery wash of white which I then rubbed away from the images with a paper towel.

IMG_9516

Add in a bit of yellow ochre for some antiquing.

IMG_9517

Then some blue and green to create a soft feel.

IMG_9519

The lower image was still really pink (much pinker than it appears in the photos) so I got out my watercolour pastels to start adding in some of the colours.

IMG_9520

I used a wet paint brush to ‘smoosh’ the colours around and keep them in the style I wanted.

IMG_9522

I smooshed in a bit more paint to get rid of the ‘line’ between the big image and the rest of the page.  Next came a bit of charcoal pencil to give the image some depth. 

IMG_9525

I remembered that I had a cool tree stencil that might look a bit like vines so out it came along with some paint.

IMG_9527

I dried off my vines with the heat gun and then added a bit of gold paint to highlight some of the leaves and vines.

IMG_9528

At this point I was pretty happy with it so I did the date stamp tag and added it.

IMG_9530

I couldn’t get a good photo of my page on Saturday night but on Sunday I took by art journal outside and got this one which I’m fairly happy with:

IMG_9535 copy

So I’ve finally done some image transferring with gel medium and I’m thrilled with the results… and with how much I’ve learnt about this technique!

If you’ve tried image transfers and have some ‘handy hints or tips’ to share I’d love to hear from you xx