Sunday 28 July 2013

Project Life: Week 30

Hi everyone :)

This afternoon I’ve had a lovely time reading my book in the sunshine… but all of a sudden it’s gotten cooler and it’s definitely time to light the fire!

It’s been a busy week here filled with loads of sorting, organising, cleaning and de-cluttering… but there’s been lots of progress so that’s a good thing.

Here’s an overview of my week:Full_1

On Monday Nina came over for a visit and we got ourselves set up at the dining room table for some much needed craft time together.  It’s really nice when you can get on with your own project but still have the company of a good friend as well.

While I was waiting for things to dry on my art journal page I got busy making spicy cheese and corn Texas muffins… super delicious! 

On Tuesday Toby decided that he was ‘over’ the tidy lounge and he decided to pull more stuffing out of his bed.  When he first started pulling the stuffing out I spent a LOT of time putting it all back in… but quite frankly he was enjoying the ‘game’ far more than me so now the stuffing just goes in the bin!

Here’s a closer look at the beginning of the week:Left copy_1

It was lovely to see Kate and William with their new little baby boy and I decided to put a photo in my album this week to mark the occasion.

With all the sorting, tidying and de-cluttering it was super easy to get my night class all sorted out… and miraculously I was actually all set up and ready for them before 7pm!

Just before everyone arrived Toby decided to pull even more stuffing out of his bed and make a big mess… he’s such an attention seeker!  I couldn’t resist adding this quote to his photo:

toby copy

Right now Toby is curled up on the sofa looking very sweet and innocent… but it doesn’t last long once he wakes up LOL

The second half of my week was spent doing more sorting, de-cluttering and looking at ways to organise my scrap room.  It’s not finished yet but I’m definitely on the right track at last!

On Friday another one left the nest… not Mikayla… our cat Brandy.  We adopted Brandy as a wee kitten almost ten years ago and she’s lived in relative peace until Toby came along.  For the first few months things were ok… and then it was summer and things were still ok… but this winter Toby has taken a dislike to Brandy being in ‘his’ house.  He barks at her constantly and quite frankly it’s too jolly cold outside for her so I took her over to Krystal’s place where she can be indoors during the cold winter nights and lie in front of the gas fire and be warm and cosy.

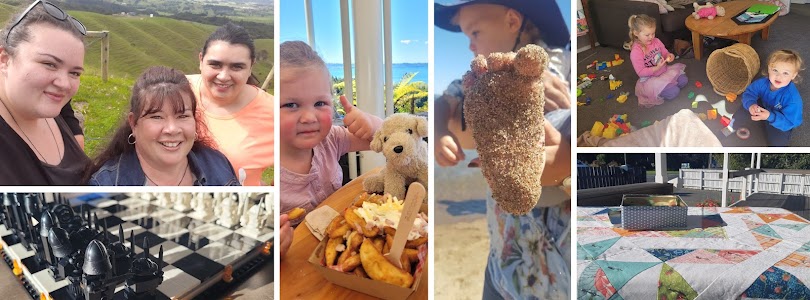
Here’s a better view of the second half of my week:Right_1

Krystal and I did lots of errands on Friday and in between jobs we went out for lunch.  It was so nice to just stop and chat for a while.  Krystal is really good company and she’s doing so many things it’s good to catch up with her for a day.

When I came home I raced around and got dinner all sorted out before Chris and Carey (teachers I work with) arrived.  I was feeling a bit of a ‘Nigella’ when they arrived and I had a Moroccan feast ready.  It’s ages since I’ve done a lamb tagine and this one was probably the best one I’ve ever made… totally delicious with all the little sides dishes.

Toby and Mikayla quite often tease each other but when I saw Mikayla reading out some of the ‘house rules’ to him I had to laugh… thankfully I had my camera close at hand because it really did look like Toby was listening to the rules!

Which brings me back to the craft room and more organising.  I saw some cool baskets the other day and thought they ‘might’ be good for craft storage… and they totally are! 

IMG_9243_1

I’ve even been busy making labels for the baskets:IMG_9244_1

This morning I was looking at the vision board I made for my One Little Word class and realised that I’d actually included a photo that was quite similar to what I’ve ended up with… just goes to show that I was on the right track after all.

The scrap room still needs a lot more work doing to it but it’s coming together really well.  I’ve even started making matching labels for my 12 x 12 drawers so when I’m done I’ll actually be able to find things really easily!

So there you have it… a very productive week and I feel like I’ve achieved heaps these school holidays.  Now I just have to get my head around the idea of heading back to work tomorrow.

Wishing you all a wonderful week ahead xx

Friday 26 July 2013

Feel Good Friday

Hi everyone :)

Another Friday has rolled around again… and it’s only a couple more days until school starts for the third term.  I’ve been busy doing some ‘organisational stuff’ for my craft room and I’m in a pretty happy place right now :)

Over the years I’ve had several different friends and family members give me help and advice on how to organise my craft room… and no matter what we’ve done it just hasn’t really worked for ME.  I get it all tidied up and as soon as I do a project the whole thing falls apart again.  But I’ve come to realise a few things:

  1. I don’t really like plastic storage in my craft room
  2. I’m probably not going to put the lid back on the container
  3. It’s got to be quick to tidy up
  4. I HAVE to be able to find things when I need them

Since I’ve been doing my art journal pages I’ve found a system that seems to be working for me… and that’s got to be a good thing! 

The next  step was to transfer what IS working for me to a bigger scale and I think I’ve really cracked it this time! 

I’m not quite ready to share what I’m working on yet… mostly because it’s not actually finished but I did browse around the internet for some craft room organisational ideas and there are so many options out there… along with some really pretty and functional scrap/craft spaces so here’s my layout for this week:

week 30 - craft room copy

My biggest piece of organisational advice is to think about the way YOU work and what YOU like and go from there.

Happy Friday xx

Wednesday 24 July 2013

Another Art Journal Page and a tutorial :)

Hi everyone :)

On Monday I had a ‘play date’ with my friend Nina.  Arranging grown up play dates is so much more fun than arranging them for your kids!

Nina and I had half the dining table each and while she worked on her stuff I worked on a new art journal page.  I’ve managed to take step by step photos so here goes:

IMG_9193

When I started my page I knew I wanted to use these resin face pieces along with some cool paperdeco stuff that I bought at the Dunkley’s show for background texture.

IMG_9194

I started off with a piece of cardstock that I’d already painted with gesso and then I added some corrugated card to begin building up my background.

IMG_9196

Next came the paperdeco stuff.  It’s really cool to work with!  All you have to do is wet it and it pulls in all sorts of different directions and makes the coolest textures!

IMG_9197

Then I used the glue gun to adhere the resin faces.   I wanted the faces to be partially hidden so I added a bit more paperdeco using mod podge to cover some of the resin.

IMG_9198

Then I had to really dry the page out.  To be honest it took quite a while because I had layered quite a bit of texture onto the page… thank goodness for my handy heat gun!

IMG_9199

Then came a layer of gesso to give me a textured background ready for paint, ink and pastels.

IMG_9200

I brushed on a layer of blue paint followed by some green and although it gave me lots of colour I was totally not loving it.  Of course I could have painted gesso over the whole thing and started again but I decided it wasn’t as bad as all that LOL

IMG_9201

I got out some paper towels and spritzed them with water and then used them to pick up lots of the colour.  I really liked the way the colour stayed in the recesses and I could definitely see the start of what I was hoping for.

IMG_9206

I dried off the background paint and then used my pan pastels to create the basic ‘tree’ shape I was after.  The pan pastels definitely added plenty of colour but they also let the original blue and green pop through as well.

IMG_9207

Then it was time to focus on the tree a bit more.  I really like the way the pastels add colour without losing the texture… so many possibilities with this!

IMG_9208

I kept going with the pan pastels adding it more detail and depth to the tree.

IMG_9210

I got out the bronze perfect pearl spray I’d made for my last page and brushed some over the resin pieces to bring out their detail.  At this stage the resin started taking on the look of very old stone… awesome!

IMG_9211

Then I got out some of my inky sprays to add a bit more colour.  I definitely had plenty of texture but the page wasn’t quite right.  I wasn’t sure what it ‘needed’ but it almost felt finished so I decided to call it done!

IMG_9213

I added the date stamp and it was all ready to go in my art journal.

IMG_9216

I was still thinking it needed ‘something’ but had no idea what.  Last night I showed my night class ladies my last few pages and they loved them all until I got to this one and they all said… “it needs something”… we tossed around a few ideas and I pondered it for a bit more and then this morning I knew exactly what I wanted to do!

I got out my Distress Markers and added some lighter areas to the trees… some darker areas to the shadows… some colours to highlight the features of the resin faces and finally some tiny little bling pieces to represent fireflies in the background and now it’s really done:

IMG_9239

Much, much happier with it now and it really does feel finished.  I also added to the date tag to remind myself that it’s ok to add things at later dates.

So there you have it… another art journal page in my book!

Thanks for stopping by xx

Monday 22 July 2013

Art journal page - tutorial

Hi everyone :)

As promised, here is the tutorial I put together for the art journal page I did yesterday.  Each step has been photographed and if you decide to use the tutorial I’d love to see what you come up with!

IMG_9149

I started with my plain cardstock that I’d already covered with gesso and left to dry.  The next step was to apply some colour and for this I used three paint colours and cut’n’dry foam to apply the colour… it made it super easy to blend the colours the way I wanted them!

IMG_9152

I’d already ‘sectioned’ my page so I knew I didn’t need any colour in the two white areas because that was for the textural part of the page.  I used some OLD chipboard letters (from a class I did at SENZ in Wellington back in 2007), some pearl beads and a small resin heart.  All items were adhered with the glue gun.

IMG_9153

The next step was to get a bit more texture on the page so I applied a generous layer of Dimensional Magic around the beads and resin heart (because it flowed faster than I was expecting LOL).  Then I added some seed beads and little watch pieces that I had left over from other projects.

IMG_9154

While the Dimensional Magic was drying, I got out my Ferro paste and dabbed it around the ART letters with a stiff paint brush… love the texture of this stuff!

IMG_9155

Next I drew in some flowers and painted them with white paint.  I did a couple of coats of paint to get some lighter and thicker areas because I really wanted the ‘brush strokes’ to be in the paint.

IMG_9158

When everything was dry I went over my two textural blocks with gesso and a small brush so that I could get into all the nooks and crannies!  It also makes it possible for the paint in the next step to actually stick to the beads, resin and watch pieces.

IMG_9160

When the gesso was completely dry (aided by the heat gun) I painted over it with black paint.  The paint really sticks to the gesso and it’s super easy to see if you’ve missed any bits.

IMG_9161

I wanted to add some colour to the textured pieces so I mixed together some Perfect Pearls (Antique Bronze) with a little water and sprayed over both areas.  I used a bit of junk copy paper to mask off the rest of the page when I spritzed too!  After I spritzed I wiped the spray off the heart and the letters to help them stand out.

IMG_9162

Next up was some charcoal pencil around parts of the flower to give it a bit of depth.  The charcoal blends beautifully… especially with a slightly damp paint brush!

IMG_9163

Next I stamped in my flax image.  I did a couple of ‘practice’ stamps with different inks on some scrap paper… the Brilliance Black was the one that made such a mess of my new stamp!  I used Archival Black Ink for my actual page and I’m happy to say that the stamp is perfectly clean again now!  Makuini would be very proud of me LOL

IMG_9165

The next thing was to put my original lines back on my page using Indian Ink.  For someone who really likes straight lines it was really hard to do the bendy, curvy thing but I’m pleased with the finished result.

IMG_9166

Then it was back to the Dimensional Magic which I brushed over the resin heart and the ART letters.  I love the way they stand out on the finished page.

IMG_9167

I added my date tag when everything was dry.  This is an OLD stamp (had it for ages and never actually used it).  By the time I got around to using it the ‘years’ were all out of date so I just cut that section off my stamp and it works perfectly.

And here’s my finished page… and stuck into my art journal:

IMG_9169 copy

IMG_9171 copy

IMG_9170 copy

Please let me know if these tutorials are helpful or inspire you.

Happy crafting xx

Sunday 21 July 2013

Project Life: Week 29

Hi everyone :)

Well what a week!  This time last week I was busy trying to finish writing my reports and now I’ve actually had a chance to do some things I’ve been wanting today for ages!  I think I’m finally starting to relax a bit and my brain hasn’t got quite so much going on in there which is a lovely feeling… if you know what I mean LOL

Here’s an overview of my week:Full_1

As you know, on Monday we had a Teacher Only Day followed by a phone call from a very upset daughter after she’d come home to find a burglar at her house.

Although I hadn’t intended going over to Krystal’s on Monday it actually was wonderful to spend some time with her and Chris and just get away from home for a couple of nights. 

On Monday night we decided that ‘comfort food’ was needed which consisted of KFC for our actual dinner along with lots of nibbly things to snack on… such a cool idea!

Here’s a close up of the start of my week:Left_1

Although it wasn’t the best thing to have happened to Krystal and Chris we actually did have a few laughs over it when the cops came… especially when it came to Chris having his finger prints (and palm prints) taken for ‘elimination purposes’.  So pleased I had my stamp pad with me!

As you know I did a couple of art pages while I was in Hamilton.  I’m so pleased I took a bit of time to put my art supplies in the car because I really needed something to focus on that didn’t involve school.  Trying to keep that work/life balance has been very challenging in the past 3 months and to be honest I wasn’t ‘winning’ the battle at all!

Before I went home Krystal and I decided to go out for a VERY late lunch and it was great!  Fantastic tastes and a chance to just sit and talk before heading back to my fur baby… Toby was very pleased to have Mumma home again!

Speaking of Toby… one of his most favourite things is ‘tato balls’!  He loves it when we have mashed potato with our dinner because Mikayla always makes extra potato especially for him and then she rolls it into balls and feeds it to him… yes he’s completely spoilt!

Here’s a close up of the second part of my week including Toby being super good so he can have another ‘tato’!

Right_1

On Thursday I got my reports checked and finalised so I was able to really begin to relax.  I did another art journal page and really lost myself in the creativity. 

On Friday I dedicated myself to cleaning...  vacuuming… polishing… dusting and de-cluttering the lounge!  I also got my new piece of art up on the wall… totally loving how it looks!

Friday night was great too!  My friend Ann had her Gold Card Birthday and she planned a wonderful celebration at a local hotel.  We wined and dined… were fully entertained and had lots of laughs!  Ann had a wonderful night and totally deserved all the lovely things said about her!

Yesterday I went over to Tauranga and Mum and I went to the Dunkley’s show.  Before we even got in the door we’d caught up with Sheree and Mark and had a few laughs going through a container of old pennies looking for the ‘right’ years.  The owner of the stall said it was the best entertainment he’d had all morning!

I did buy a few goodies… mostly art journal things… although I couldn’t resist the Belgium truffle stall!!  We saw lots of cool stuff including some artwork by a NZ artist that really caught my eye.

Which brings me to today… and I’ve spent most of the day working on another art journal page inspired by the artist I saw at the show yesterday.

Here’s my journal page:

I did take step by step photos for another tutorial so if you stop by tomorrow I’ll show you how I did it!  Loving all the texture and it was a very pleasurable way to spend my Sunday :)

So there you have it… Week 29 is done and dusted!

I hope you’ve all had a great weekend xx

Saturday 20 July 2013

Another art journal page + tutorial :)

Hi everyone :)

When I created my journal page on Thursday I took HEAPS of photos and made sure that I got all the steps photographed so that you can see how it all came together.  The actual page took me a couple of hours… but it was spread over a day because I had lots of jobs to do LOL  Besides, going to get some groceries gave the modelling paste time to dry!

For those of you who like to see the ‘big picture’ of where I’m headed here’s my finished page in my art journal:

IMG_9144

Here’s the photo that inspired my art page:

34171038.RedSunflowerWithFly_5433

I really loved the colours and textures in the sunflower so I decided to have a go and see what I came up with.

I started off with some plain white cardstock and Tim Holtz tissue wrap which I’ve had for ages and never really used before… cool product!  I stuck it down with the glue stick that was in my goodie bag from Creative Adventure.  I’m not much of a glue stick girl but this one (Xyron) was actually pretty good.

1

After I stuck down the tissue paper I decided it was a bit plain so I stamped one of my old stamps over it… so love that I’m using stuff out of my stash again!

IMG_9076

I wanted lots of depth and texture on the page so I created a brick stencil using my Silhouette with quite a lot of ‘grout’ showing and then I decided to play with a technique that I’d seen online.

IMG_9077

For the technique you brush gel medium over the stencil to create a resist.  I found ‘brushing’ wasn’t the best thing and ended up ‘dabbing’ it all over with the foam brush.

IMG_9078

Remove the stencil and then let it dry… or if you’re impatient like me you can use a heat gun!

Next I got out my Pan Pastels (seriously loving this product!) and go over the page.  The dried gel medium resists the Pan Pastel creating the ‘grout’.  You can see I haven’t quite finished the ‘grouting’ in this photo but it kind of appears like magic when you’re doing it.

IMG_9079

Then I sprayed the page with fixative to ‘set’ the pastels.

IMG_9080

Next I wanted to add some colour… so I used a wet brush and three paint colours to create a bit of a wash.  You can clearly see the ‘grouting’ through the paint.

IMG_9081

When it dried (ok, yeah, I did dry it with the heat gun LOL) the colour got lighter so I decided to do another wash of the same colours over it to add more depth.

IMG_9083

More heat gunning and I was a happy camper!

Then it was time to get to work on my sunflower.  I ended up making my own stencil to the size I wanted out of Kraft cardstock.  It makes cheap stencils!!

IMG_9084

Then I used my cake decorating skills to apply the modelling paste over the stencil.  I wanted lots of texture so I made sure it wasn’t all perfect!

IMG_9085

It’s quite exciting lifting off the stencil because you’re never exactly sure how it’s going to turn out but this one worked really well.

IMG_9086

Then you have to leave it to dry.  I’ve found that trying to speed things up with the heat gun doesn’t really work for me so at this point I went and got my groceries LOL

Once the modelling paste was dried I decided to add some Glass Bead Gel to the flower centre to give it a bit more texture.  And yes I let that dry naturally too!

IMG_9091

Then the fun began!  I got out my Pan Pastels… they REALLY stick to the modelling paste (I did lots of layering and sprayed with fixative in between to build up the colours the way I wanted them).

IMG_9095

Then it was time to work on the flower centre but I found the pastels really do not stick to the glass bead gel very well at all!

IMG_9096

Hmmm… ok then… lets try paint!

IMG_9098

The paint definitely did stick but it looked a bit ‘flat’.  One thing I know is that pan pastels WILL stick to paint so out they came again!

IMG_9099

Then I decided to add a little bit of gold and got out my metallic rubs… awesome!

IMG_9100

I was getting pretty happy with it all at this point but it just ‘needed something’.  I went in search of ‘something’ but had no idea what I was actually looking for when I came across some word stamps I’ve had for YEARS!  I think they might be Heidi Swapp ones but I’m not completely sure.  I used Versa Mark and gold embossing powder to apply the word.

IMG_9101

At the last minute I decided to add a bit of gold embossing to the centre of the flower as well and then it was time for the date tag.

IMG_9104

Pretty happy with my finished page!  I’m so pleased that I saw the sunflower photo when I did and I’m pretty stoked with my interpretation of it:

34171038.RedSunflowerWithFly_5433 IMG_9144

So there you have it… the making of an art journal page :)

I hope you all have a fabulous Saturday xx