Showing posts with label Distress Ink. Show all posts

Sunday, 8 October 2017

The Daily Marker 30 Day Challenge - and some more Chloe

Hi there :)  Today I've got the final 10 days of colouring from The Daily Marker 30 Day Challenge.  I totally enjoyed this challenge and I know I'll do it again!

Day 21 

 This one is a card that I made for one of my friends who organised the scrap retreat and features a chef from my colouring on Day 15.

Day 22

I used one of those unicorns from Gerda Steiner designs to make Michael a birthday card.  He totally loves unicorns so it was an easy choice to buy this stamp and die set.

Day 23

I stamped and cut a few hedgehogs on watercolour paper.  They are from MFT's Happy Hedgehog stamp and die set.

Day 24

Lots of brown colouring today using Distress Inks.  I love the richness of colours you get when you layer the inks.

Day 25

Time to break out the colour!  I added some red, orange, greens and blue to the little hedgehogs... thank goodness for having Google on my phone when I was looking for the acorn colouring!

Day 26

Time to make a background for my hedgehog card.  I blended Distress Inks onto Bristol Smooth cardstock... love how easy the ink blends together!  

While I had my inks out I inked and blended another piece of Bristol Smooth cardstock so that I could cut some Autumn/Fall leaves.

Day 27

I inked up some more Bristol Smooth cardstock using Distress Oxide Ink - mostly using browns - to make the frame for my card.  I used Lawn Fawn's Leafy Tree Backdrop for this card.  As you can see I also added some water spritzing to my background from Day 26.

Day 28

Yay a finished card!  I added a couple of hedgehogs (which I backed with foam for extra dimension) along with some Autumn/Fall leaves.  This card was for a friend of mine who has been unwell (read that as 'sick as a dog!') she also loves hedgehogs so I was pretty sure she was going to like this one.

Just lately I've been decorating the inside of my cards as well and I haven't really shown them but I'll share this one with you as I'm super pleased with how it turned out:

Day 29

Since I had all the things out for my previous hedgehog card I thought I'd make one more.  This one was scraplifted from Tricia Barber:

Day 30

For the last day of the challenge I really didn't know what I wanted to make/colour so I stamped some polar bears, heat embossed and then die cut them... and to be honest they're sitting in a little container waiting to be coloured because I had some other projects that needed my attention.

And now for some Chloe time... being a Nana is awesome!!  I love this little girl so much already.  Mikayla and Chloe flew into Rotorua last Monday and the snuggles and cuddles commenced immediately!  Auntie Krystal came with me to the airport and it's been an awesome week of family time since then.  Here's a few little snippets from this week:
Shopping in Farmers with Nana.  She slept like this for about half an hour and it's was lovely :)

Uncle Toby has totally fallen under Chloe's spell.  He absolutely adores her! 

 Chloe was having some tummy time so Uncle Toby joined in :)

Miss Chloe was helping me in the kitchen... and sporting a new little onesie that Nana bought for her!

Thanks for visiting today... time for some more Chloe cuddles now xx

Sunday, 1 October 2017

The Daily Marker 30 Day Challenge - Day 11 to Day 20... and a little bit of Chloe!

Hi there :)  I'm happy to report that I actually managed to complete the 30 Day Colouring Challenge with Kathy from the Daily Marker.  Last time I blogged, I shared the first 10 days so I thought it was about time to share the next 10.

Day 11

This was my first attempt at colouring with Distress Oxides and I'm pretty pleased with the results... they certainly blend together nicely and give a beautiful chalky feel to the paper.

Day 12

I made this card with the background from Day 11 and some of the images I coloured on Days 7-9.

Day 13

Time for a change... I got out my MFT Recipe for Happiness stamp set and started colouring some of the super cute chefs using Zig Clean Colour Markers.  LOVE how easy they are to shade and blend together!

Day 14

More colouring on my wee chefs... loving the red combo!

Day 15

I thought I'd do some more chefs with different colours.
Some more chefs... this time featuring a blue combo.

Day 16

I did these ones while I was away at the Scrap Retreat... those Moody Unicorns from Gerda Steiner Designs are super cute and really easy to colour!

Day 17

This is a totally different look for me!  I borrowed a friends die and cut it from black cardstock so that it appears to be the lead surrounding the stained glass.  I did the colouring with Distress Inks.

Day 18

Another little change... this time it's MFT's Polynesian Paradise... and to be honest it's had no more colouring on it since this photo was taken... oops!

Day 19

Totally love this card!  One of my friends who organised the Scrap Retreat actually had a wee accident on the morning the retreat started and twisted her ankle.  I knew I had a 'Happy Fall' sentiment as well as the 'Oops' so this card was made for her... pun intended :)  This one features some gorgeous squirrels from Gerda Steiner Designs.

Day 20

I got the stained glass card completed and really love how it turned out.  This one is currently sitting in my craft room and I'm actually considering framing it and keeping it just because I like it so much.

I'll share with you the last of my colouring for this challenge in the next few days.  In the meantime. I've got a Secret Squirrel craft project I'm working on before my wee grandbaby arrives at Nana's house TOMORROW night!!!  Can you guess that I'm excited??  I can't wait to see my daughter again and cuddle this little princess:


Yay for school holidays!  Have a great weekend xx

Friday, 22 September 2017

The Daily Marker 30 Day Colouring Challenge - the first 10 days!

Hi there :)  I've been taking part in the 30 Day Colouring Challenge held by Kathy R and I'm really enjoying myself.  I've actually been getting a lot more time in my craft room and making a conscious effort to be more productive with my crafting... of course, going on a craft retreat last weekend helped as well!

I thought I'd update you with how things have gone during the first 10 days so here goes:


Day1

Background created with Distress Inks on watercolour paper.

Images from MFT Mermazing stamp set.  Colouring the skin with Distress Ink.


Day 2

Rocks, shells and fish from MFT Mermazing and some more Distress Ink colouring.


Day 3

Finished the mermaids I started on Day 1.


Day 4

Finished card - this one was for one of Michael's nieces who just celebrated her 21st birthday.

Another finished card - this one was a commission card for a twelve year old who is planning on being a marine biologist when she leaves school.


Day 5

First stamping with MFT Witch way is the Candy? stamps... I don't celebrate Halloween but I couldn't resist that cute little witch!  Images coloured with Distress Inks.


Day 6

Images from MFT Grave Situation... loving the combo of Pumice Stone and Hickory Smoke Distress Inks for the tomb stones.

Die cutting the coloured images from Day 5.  They look different when you cut them out!


Day 7

A few more images from MFT Grave Situation and Witch way is the Candy? stamps... and a bit more of the Pumice Stone and Hickory Smoke Distress Inks.


Day 8

Having a go at doing a monochromatic look using Distress Inks on the witch... really loving the look of this style.


Day 9

See what I mean about how different the images look once they're cut out??  

Here's a finished card with the Witch way is the Candy? images.  This is the card that I entered into the MFT Card Design Competition which is only hours away from closing!

Here's a close up of the card:
All stamps and dies are from MFT... you can see all the details HERE.


Day 10

Another finished card featuring more of the coloured images from MFT Witch way is the Candy? and Grave Situations.  The big spiderweb background is cut from black glitter cardstock and die cut with  MFT's Spiderweb dienamic.  I love how it sparkles!

So there you have it... 10 days of colouring.  This represents a whole lot of fun and creativity... and a big chunk of Happy as well :)

Thanks for visiting my blog today xx... and feel free to leave me a comment :)

Sunday, 10 September 2017

My Favourite Things - Card Design Superstar 2017

Hi there :)

During the Daily Marker 30 Day Colouring Challenge I've been having a really good time with my newly acquired 'Witch way is the Candy?' stamp and die set.  I've been colouring some of the images in traditional Halloween colours (orange, green and purple) and then I hit on the idea of a monochromatic colour scheme using Pumice Stone and Hickory Smoke Distress inks... and I LOVE the results.  In fact, I love the results so much that I've decided to enter my card in MFT's Card Design competition (click on the pic to read all the details):
https://www.mftstamps.com/blog/you-could-be-a-2017-card-design-superstar/


After reading what was required for each different category... and a bit of gentle persuasion from a fellow colouring challenge creator (thanks Patricia)... I decided to enter my card into the 'Coloring Virtuoso' section.

Coloring Virtuoso

Whether your preferred medium is paint, marker, or pencil, coloring is a skill you’ve honed since those early years spent with Crayolas and a favorite coloring book. The MFT collection of images is vast, so now is your opportunity to show off your exceptional coloring skills!

Here's my entry - A Halloween Hello

My Favorite Things products used:

The galaxy background was created using Gansai Tambi paints... totally love how it turned out!

All of the stamped images were coloured using Distress Inks:
  • Twisted Citron - frogs eyes
  • Antique Linen and Tattered Rose - witch face and hand
  • Hickory Smoke and Pumice Stone - all other colouring including sentiment banner
The witch and frog are both popped up on foam for some extra dimension and the cute little witch broom that was used as a prop is from - Tim Holtz Idea-ology BROOMSTICKS... super cute and just perfect for this card.

Thanks so much for stopping by my blog xx

Saturday, 9 September 2017

Mermazing cards

Hello :)  I've been taking part in the Daily Marker 30 Day Colouring Challenge and I'm pretty pleased to say that I've actually spent time in my craft room colouring EVERY day.  Some days it has literally been for about 15 minutes but most days I've been able to squirrel away a bit more time... which makes me a very happy crafter!  You can see my latest colouring creations in the Instagram shortcut - side bar on the right.

I haven't just been colouring though... I've actually been using some of the images to make cards and today I've got two cards to share with you featuring MFT stamps Mermazing stamp & die set.

The first card is for one of Michael's nieces who is about to turn 21.  I used MFT's Mermaid Tail background stamp and distress inks to create a background (with wonky edges - such a cool technique) and then added the images to the front of the card.

The second card I created was another commission card.  This time it was for my friends Goddaughter who is going to be celebrating her 12th birthday soon.  When I asked my friend if she thought her Goddaughter would like a mermaid theme she was ecstatic because her Goddaughter is hoping to become a marine biologist when she gets older... how perfect is that???  Here's the card:

The background of this card was created using MFT's Whimsical Waves stamp and Distress Inks.  I really like the little white dot detail on the mermaid and the fish swimming in the water.

Thanks so much for visiting my little corner of the universe :)

Sunday, 3 September 2017

Shake, shake, shake... shaker cards!

Hi there :)

Remember when I was commissioned to make the space card for a little boy who was turning 3?  Well his younger siblings were celebrating their first birthday within a couple of days of him and I was asked to make their birthday cards as well.  Since they're twins I made cards that were 'the same but different'... here's the finished cards:

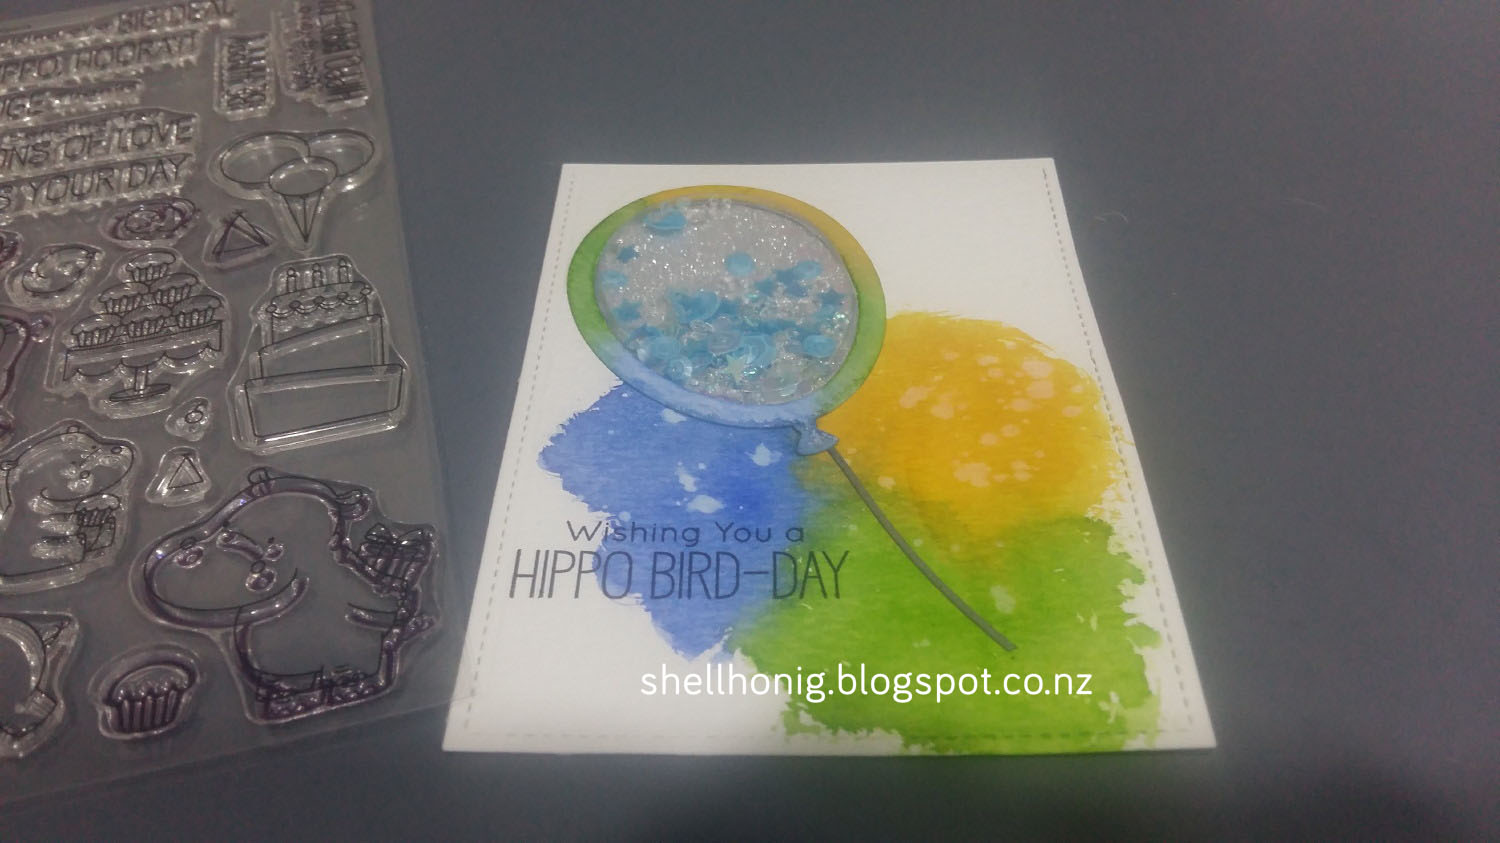
I made the wee boy's card first using MFT's Happy Hippos and Balloon Shaker Window die set.  I started off with a piece of watercolour paper that was die cut using my ever faithful stitched rectangles die... I think this must be my most used die I own!  I then watercoloured some Distress Ink onto the paper using the 'wet on wet' technique with Mowed Lawn, Blueprint Sketch and Fossilized Amber.

While I had the inks already on my craft sheet I used the rest of the ink to colour the die cut balloon frame... love how that turned out!

Next I die cut the opening for the shaker card... make sure you have a pretty good idea of where everything is going on your finished card so that you have room for everything... just saying LOL

Then it's time to start assembling the shaker card... this is the really fun bit!

Along with the Balloon shaker pouch from MFT I used some Ice Cube Jewels and Lagoon sequin mix from Little Things from Lucy's Cards.   I've got a growing collection of pretty things from this company and apart from looking cool in shakers they are also delightful to look at on my shelf... and I do like pretty things :)

I loaded up some of the sequins and the ice cube jewels into the shaker pouch and then ran some glue around the edge before sticking it down onto some glitter cardstock.  Multi Medium Matte is definitely my 'go to' adhesive for this kind of thing because it sets quickly and extremely securely!

The next step was to adhere the shaker pouch to the back of the card front using some more adhesive... that sounds more complicated than it should... take a look at this photo and you'll see what I mean:

Next I added the balloon frame and the 'string'.  At this point I also realised that I hadn't stamped my sentiment on the card front but thankfully the shaker pouch is relatively the same depth as the MISTI magnets so it wasn't even an issue. 

Time to add my pre-coloured images... a cute litte hippo and a wee bird.  I die cut some foam to give them extra dimension and it worked really well.  At this point, I layered the card front onto some dark blue cardstock which really made the colours pop!

I added another hippo to the inside of the card:

And here's the finished card:

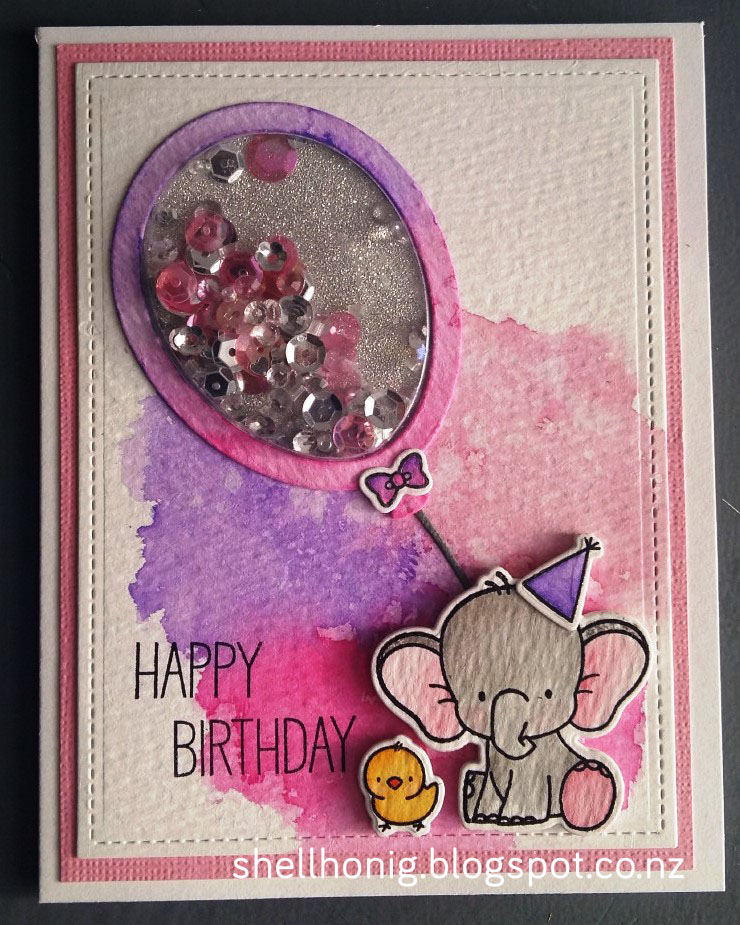
And now for 'the same but different'... since I'd already worked out my basic design, the second card came together really easily.  Colour the watercolour card using Distress Inks - Picked Raspberry, Worn Lipstick and Wilted Violet. 

I coloured a balloon frame as well and die cut a window for the shaker pouch:

This time I used some more Ice Cube Jewels along with 'Magic Wand' sequin mix for the shaker pouch:

At this point Michael came into my craft room and I forgot to get a few of the photos I wanted but here's one of the inside of the card:

Here's the finished card featuring MFT's Adorable Elephants... love those little guys!

Here's a photo of all three cards together.  I really did love making these cards and I know they were all really appreciated by the recipients and their family :)

Thanks so much for stopping by today xx