Showing posts with label Nivea. Show all posts

Saturday, 2 March 2019

It's been a while

Hey there... remember me?
According to an online calculator it has been this long since I last blogged:
  • 1 years 4 months 4 days
    or 16 months 4 days
    or 69 weeks 6 days
    or 489 days
    or 11,736 hours
    or 704,160 minutes
    or 42,249,600 seconds
I don't know who makes these online calculators but they sure do come in handy when you want to find out all sorts of information.  I came across the calculator recently when I was trying to work out how old the students in my class were... super helpful!

So yeah I'm back... and things in my life have changed a lot... some for the better... and some in 'character building' ways.  Let me just say that I feel I have enough 'character' for now and I'd like a few less lessons to be learnt in the upcoming weeks!

So what brings me back to Blogger? To be honest I don't know... I think it's the need to connect with others... and in part to give me a voice... there are people in my family that would argue that I have quite enough voice for one person LOL

It's also the desire to get back a piece of myself that has been missing for quite some time.  Even as I write this, I can feel a little bit of myself creeping back in... and quite frankly that's a good thing.

So rather than be all mysterious about what's changed I'm just going to put my cards on the table... not all of them mind... after all a woman needs to keep a little hint of mystery about her don't you think?

I've spent part of the morning revamping my blog a little bit and you'll be able to see some changes straight away.

Here's the 'before' banner:

And here's the new one:

  • Michael (Mike) is no longer part of my life. Without going into detail, he recently decided that there was someone else he saw his future with and he has moved on to pastures new. That was 'character building' for sure!
  • Nivea (Michael's dog) has also moved on to pastures new in the form of going to live with his mother in another town.  She is still getting out of fences in her new home so nothing much has changed for Miss Nivea.
  • Toby is now an 'only child' at home once again and he is super happy about it! If you've never seen a dog 'smile' you need to see this photo:


  • I have a new hobby... geocaching! I discovered geocaching early last year... in fact I logged my first find on January 2nd 2018.  Since then I've found 873 caches and had some amazing adventures. Michael and I traveled to Norfolk Island via Sydney, Australia in July 2018 and located every cache on Norfolk which I am super proud of... check out this map from our trip... all the little smiley faces are the caches we found... they represent hours and hours of hiking and exploring as well as hundreds of amazing photo opportunities!

  • One of the biggest changes is that my little Doodlebug has grown up a LOT!  She's now over 18 months old and such a delicious little bundle of fun.  I get to see her regularly and we have developed a fantastic bond.  Family dinner nights are held every Monday night which gives Nana a definite night to see Miss Chloe along with her Mummy and her Auntie Krystal. She also comes to stay with me on a regular basis which is so much fun... and more than a little tiring at times.  She has so much energy!
  • There have been changes at work too.  I still work for a local Special Needs school however I have changed location.  I'm lucky enough to work in a Satellite class and this year I have five boys in my care with lots of autistic needs and talents to explore and develop.
  •  I have also joined the Marie Kondo revolution for tidying, de-cluttering and bringing more JOY into my home and life... and I'm a convert.  I'm not a naturally tidy person... my family will attest to that wee character flaw... but since learning about Marie's methods and actually putting them into practice I've been living with growing levels of JOY... it's a good thing!
So there's my current status in a nutshell... it certainly hasn't all been smooth sailing in recent months... and there were times I thought the oncoming lights were a train about to run over me... turns out it was more of a lantern showing me the way... and now that I'm out the other side there is a great view and more adventures heading my way.

Thanks for visiting and I hope life is treating you well xx

Sunday, 26 February 2017

More gift card holders... and a little bit of a naughty puppy!

Hi there :)

Following on from yesterdays post about using my new Lawn Fawn small stitched envelope die to create gift card holders I wanted to share a couple more that I made.  Since I had the basics sussed I thought I'd try something a little more creative with the next two... and I remembered to take step by step photos!

I started off using a Winnie & Walter stamp called  Do you see what I see to create my background.  I stamped the background with embossing ink and then heat embossed with clear embossing powder.  This stamp is only 3x4 inches but it's perfect for little projects like this.

Next I got out a couple of my Gansai Tambi paints to give my background some colour.  I really like how soft and creamy these paints can be... but they're also perfect for doing colour washes.  Colours used: Pale Aqua (50) and Cornflower Blue (61). 

Another cool thing about using Gansai Tambi paints is that if you use one colour a lot you can actually just buy individual watercolour blocks in the little plastic trays to replace the colour you've run out of... totally brilliant!

Right, back to the project, after letting my little background dry a bit I ran it through the Big Shot with the front panel die from the set.

So pretty and the stitching really adds a finishing touch!

Next I decided to add a gorgeous polar bear from MFT Polar Bear Pals stamp and die set.  After stamping and heat embossing my image I die cut him and then coloured him using my Zig Clean Color Markers.  I was able to colour match his scarf pretty well with the background colours too!

Then I decided to stamp a sentiment on the background.  It looks a bit patchy in the photo but in real life it's pretty good.

Since I was trying to take things up a notch I decided to stamp and heat emboss another sentiment on the back of the envelope.

Then it was time to adhere the front panel and the polar bear to the envelope.  The front panel was adhered with tape runner and the polar bear is on foam dots for a bit of added dimension.

Of course, it's a bit silly to say 'I come bearing gifts' without there being some polar bear gifts so I decided to stamp, emboss and colour a cute little bucket of fish from the set.

It really did help finish off the back panel:

At this point I decided the front panel needed something... and I had just the right something for it... some GORGEOUS sequins from Lucy's Cards... this pack is called Cool Breeze and I'm totally loving all the little bits of gorgeousness included in the pack!

Just an FYI: The packs from Lucy's Cards arrive in little zip lock bags but I wanted to have mine on display... I've bought several sets... so, while I was at a local chemist I saw these gorgeous little glass jars and couldn't resist them.  I emptied all the packs into their own jars, peeled the stickers off the little bags and added them to the fronts of the jars and voila... lots of pretty things to look at and USE!

Here's how the front panel turned out:

At this stage the mojo was still completely flowing so I kept going and made another gift card holder.  This time I used a Prima Stamp from their Bedtime Story collection.  I bought this stamp several years ago and never got around to opening it so it's definitely a NBUS item!

This time I used Rangers Queen's Gold embossing powder and stamped the image in two halves to create a full background.  I didn't worry too much about the 'join line' because it wasn't going to show up in the finished project.

This time I used dark colours from the Gansai Tambi paints to colour my background, Deep Blue (67), Deep Violet (38), Menthol Violet (66),  Dark Brown (47), and Black (20).

Then I die cut the label from my newly created background and stamped, embossed and die cut an image from MFT Adorable Elephants stamp and die set.

I coloured my elephant using Zig Clean Color Markers... I love how gorgeous he is!

I stamped one of the sentiments from the Adorable Elephants set and die cut it with a little banner die from MFT Tag Builder Blueprints 6.

Then it was time to put it all together... and add a few little glimmer star sequins along with a rhinestone on the sentiment banner!  After all, who can resist a little bling??

I wanted to 'dress up' the back of the gift card envelope so I stamped and heat embossed some stars from Lawn Fawn's Summertime Charm stamp and die set.  I also die cut some little stars from some of the left over background.  Unfortunately I didn't check my photos very well because it was a bit fuzzy... but I'm sure you get the idea.

I did think to get a 'group photo' with all my little envelopes... so much cuteness in one space!  You definitely want to click on the photo to see them in more detail!

So there you have it... an Auntie's solution to making a gift card more than just a gift card!

Now for something from the 'home files' section... our fur babies KNOW they're not allowed on the bed... but I often find one or the other one on the bed having a little nap... actually it's more Toby than Nivea that does that!

Having said that, on the weekend, Michael often says that they can come up on the bed for a cuddle... but yesterday I walked in to find something quite different... Miss Nivea was not just on the bed... she was IN it.  Actually she was TUCKED IN!  Thankfully I had my phone on me so I was able to capture a quick snap of her!

Daddy (Michael) was still in bed and this naughty little girl was all snuggled up beside him and had her head on MY pillow!!!  When I got the first photo she looked up at me as if to say... but Daddy said I could be here:

If Auntie Nina saw this she'd be saying... Back to the pound!

Thanks so much for visiting my blog today xx

Monday, 30 January 2017

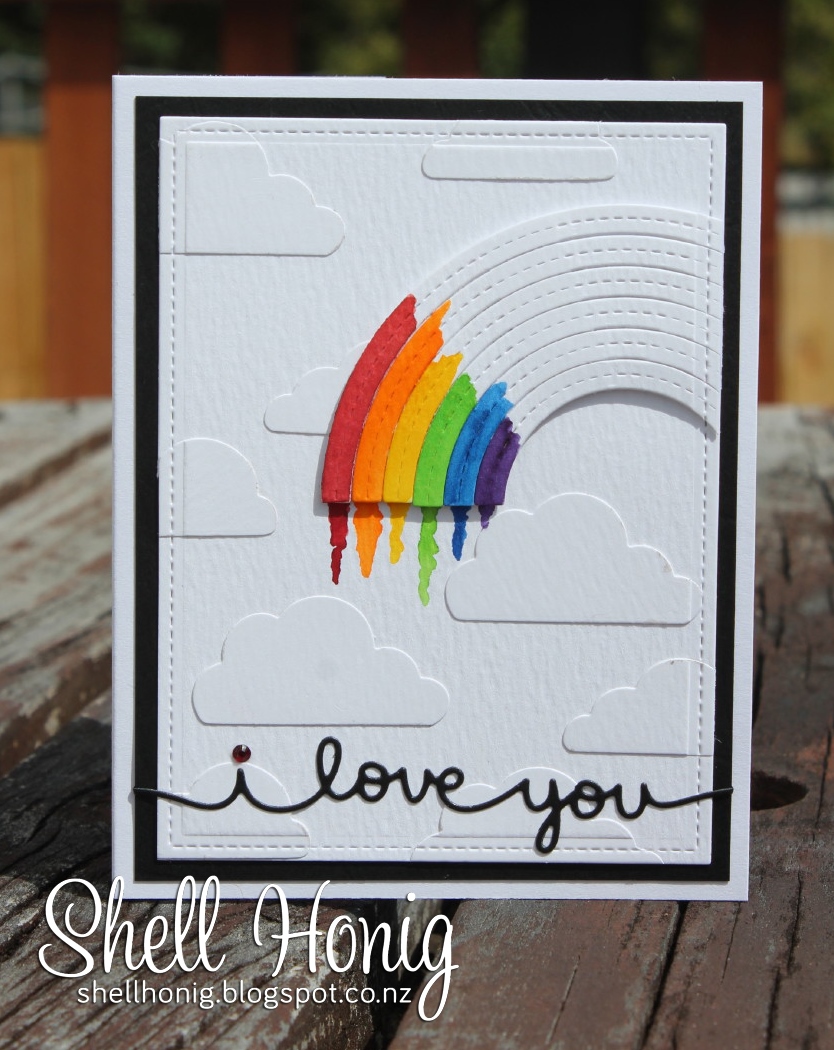
More rainbow cards... and a little bit of... Believe it or Not!

Hi there :)

I'm still loving my new stitched rainbow die and since I enjoyed making my card from yesterday so much I decided to go ahead and make a couple more... 'the same but different'.

Here's my card from yesterday:

I was busy putting together my next card when I noticed a cute little dragon that Krystal had coloured with my Zig Clean Color Markers and he was the perfect purple to go with the purple on the rainbow.  Then I decided I needed to add a different sentiment so I die cut 'thinking' from Tim Holtz - Celebration word dies... the 'of you' was from a Hero Arts stamp and die set called Prayers.

The final step was to add some purple rhinestones for the 'tittles' and my card was done.  Here's how it turned out... isn't that baby dragon super cute??

I went through some of the other images Krystal and I have been colouring and found a little duck from the Gerda Steiner - Lucky Duck stamp set.  He seemed to be waving at me so I cut 'HELLO' from my Tim Holtz - Alphanumeric dies.  No rhinestones this time... pretty simple really!

And here's my cards together... have to say I'm pretty pleased with them:

It's hard to believe, but, the school summer holidays are practically over... it's back to school tomorrow and although I'm a little excited there's also a little bit of this going on in my head:

I'm sure it will all be fine when my alarm clock goes off in the morning... I'm sure I won't miss getting into my art studio... LOL who am I trying to convince??

Meanwhile I have a little bit of home stuff to share with you.  We've been having open homes and we've had some good feedback.  One of the things mentioned was that the windows and doors needed a little bit of attention so Michael has been painting them.  He's worked his magic around about half of the house now.

Here's a 'before' picture of one of the window frames... to be honest I'd never really noticed the colour before... I guess I just got used to it over time:

It's kind of a nondescript peachy/creamy colour... but now the windows are looking more like this:

I'm amazed at how much more modern they look!  Michael also installed a new light above the door so it looks really good now!

He also got 'painty' with the back door... love how this turned out!

We don't have a cat but both Toby and Nivea poke their heads through when they get put outside!  I'm also greeted by one of their heads through the cat door when I get home every day...  quite cute really.

The back deck area is looking very smart now too:

It's quite cute that Nivea's dog house matches in with the new paint job too!

And now for some Believe it or Not... or as I like to put it... 'Will the man never learn' files! 

Remember when Michael fell of the ladder/concrete wall because of his jandals?  Well it would seem that he has yet to learn his lesson about wearing jandals up on the ladder... and while I do admire his 'kiwi ingenuity' in getting the window frames painted I do despair of his 'health and safety' abilities... have a look at the photos and you'll see what I mean... about the kiwi ingenuity and the jandals!


Yes that IS Michael up the ladder... wearing jandals... again!


In spite of the fact that he was up the ladder he was still finding it hard to reach a few places but with a little kiwi ingenuity he had an 'extendable paint brush'!


I thought this one was quite clever... using the 'extendable' paint brush from the safety of the deck... and then I came outside to find him doing this:

Oh dear... it seems that I'm in for a long road of dubious safety photos ahead of me!

Meanwhile, the fur babies were not to be left out of the action!  Yesterday I spent quite a long time cleaning down the stair leading to outside... I brushed, washed and scrubbed the concrete steps until they looked really good... and then this morning 'someone' did this:

Michael said it was Toby... but I suspect Nivea did her fair share of digging and dirt spreading as well!

So that's it for today... back to school tomorrow so I think I might head down into my art studio for the afternoon.  Thanks for visiting the blog today xx

Saturday, 21 January 2017

Mermaid cards

Hello :)

I've been having some fun in my art studio designing mermaid cards.  It all started when I found a stamp I'd had in my stash for YEARS.  Within minutes of finding the stamp ideas started flowing and I just had to go with it and here are the results.

I started out with this stamp from Sugar Plum Stamps.

I didn't take all the step by step photos I usually do because the design was buzzing around in my head but I think I got most of the steps.  I decided to do a set of four cards so I stamped all the mermaids with black ink and then heat embossed them.

I knew I wanted to do a watercoloured background so I painted over my stamped image with masking fluid and then I left it alone to dry.

When the masking fluid was dry I started on the water.  I used the wet-on-wet technique to paint in the water using Salty Ocean and Mermaid Lagoon (how appropriate!) Distress Inks.  I also did an extra piece of watercoloured card using the same technique... trust me, it will make sense later on!

Then it was time to add some colour to the sky.  I die cut some masks using Lawn Fawn Puffy Cloud Borders from regular card and then I used Tumbled Glass Distress Ink and a round blender to create a sky background.  It's the first time I've used this technique and I really like the effect.

Meanwhile... it had started to rain and Toby and Nivea wanted to hang out with me, so I brought their beds down to the art studio.  Then Nivea decided that running around in the rain like a loon was right up her alley!  Even though Toby had access to his big bed he decided to squeeze himself into Nivea's bed and then look at me as if to say... this bed isn't big enough for me... silly boy!  I couldn't resist getting a photo of him!
 

Right, back to the cards. The next step was to unmask the mermaid... I never get tired of seeing the design being uncovered!

I had an idea for making waves out of velum using my Mama Elephant Ocean Waves Trio dies.  The only problem was I couldn't find my velum anywhere!  It turns out that it's not so easy to get anymore.  Spotlight didn't have any... neither did the emporium art supply stores... neither did Warehouse Stationery.  In the end I bought some translucent tracing paper.

I got my dies out and cut the waves from the tracing paper.  Then I cut the tops of the waves from white cardstock using the same dies and stuck them to the inside of the waves and I love how it came together.

Once I had the wave idea sorted it was onto the colouring.  I used my Zig clean colour markers to colour in the images along with my waterbrush to smooth out the colours.  I got inventive with the colouring and did each mermaid in different colours and with super bright hair.  Here's a few images to give you some ideas of what I was working on.


At this point I got so carried away with the colouring and making the waves that I actually didn't take any photos!  I did manage to get photos of the gorgeous sequins and things that arrived in the post the other day which I now have in little glass jars... LOVE LOVE LOVE!  I used some of these delightful little goodies to add a splash of magic to my cards.

Here they are waiting for the sequins to dry overnight.  Have you spotted the blue wave in the front?... that was made using the extra piece of watercolour background from the start of this post.

This morning I took my cards outside to get good photos of them...


I have to admit that the mermaid with pink hair is my personal favourite!  Do you have a preference?

Here they are all together:

Thanks so much for dropping by my blog today xx